
Replacing a traditional control panel with Touch Toggles gives better access and readability. This panel fits 29 controls into a 12″ by 7″ frame quite comfortably. The frame and cover glass is a common picture frame from Michaels Craft store that cost about $10. The angled mounting blocks were cut from a small wood scrap.

Here the old panel hangs below the new installation. Mounting the Direct Bases behind the new panel’s ultimate location lets you stand in full room light while connecting the new panel. In this installation, multiple direct bases share a power supply by simply plugging one into the next.
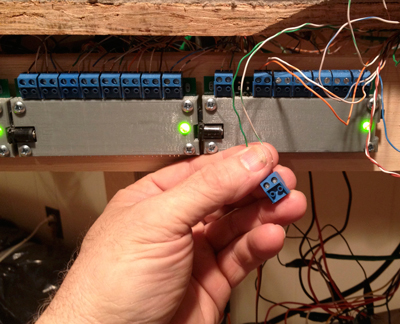
Connecting the switch machine wires to the base is easier if you pull the removable terminal pair from it’s contact pins, and working where you have more light and space. Removable terminals also make it simpler to rearrange the wire order on the base, if needed.
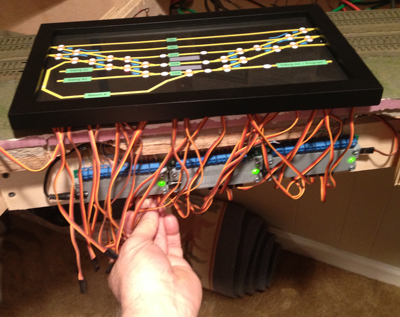
The controls and panel graphic were assembled on the kitchen table before this installation. The fancy layout is a simple line drawing redrawn in an inexpensive computer drawing program, and then printed on a desktop inkjet printer. The graphic is printed on white paper. The LED light from each Touch Toggle control shines on the back of the paper. The effect is a bunch of nice bright round dots visible on the front. (No holes are needed through the paper.)
We didn’t need to label any of the pigtail wires from the controls. Temporarily plugging in each component lights up the attached control and lets you easily see which Toggle’s wire you have. Then you can move it to the correct turnout’s input. Once connected, you can immediately test the turnout to make sure it is operating properly. If you make any mistakes, swapping toggle plugs is simple. Properly connecting this panel to the base took about 30 minutes.

Once all the Toggles are connected all the lights glow and clearly show the track orientation. Every turnout can be operated at this point. This panel uses two-light red/green Toggles for all of the turnouts, and yellow momentary touch controls for the station’s electric uncouplers. Relays are used to switch the large current of the uncoupler coils.
The choice of which type of Touch Toggle to use: One-light red/green, two-light red/green, or two-light green/green in different locations has become a hotly discussed topic amongst our users. Everyone seems to have a unique opinion, but they all work..

The final installation helps to keep rail traffic flowing.
A professional finish and easy to clean installation with no moving parts keeps the panel looking great, something to be proud of, for years to come.
Jump straight to:
Touch Toggles – used to create all touch panels
Direct Systems – suitable for driving stall motor machines
Snap Action Systems – quiet control of twin-coil switch machines
Snap Bipole Systems – convenient operation of Kato and Rapido Trains switch motors
Servo Systems – use radio-control type servo motors to throw your switches
Real-Switch Relay System – great for controlling lights, tracks, and uncoupling electromagnets